
“She gets up while it is still night; she provides food for her family…” -Proverbs 31:15
Freezer Meal Prep
**This post may contain affiliate links. That means if you click and buy, we may make a commission at no extra cost to you. Please see our full Disclosure Policy for more details.**
Living out this verse meant Freezer Meal Prep was a large part of my weekend. Raise your hand if, like me, you sometimes block out the fact that husbands and children expect to eat dinner every single night? I’ll keep myself busy during the day so I don’t have to acknowledge the cold, hard truth that I haven’t shopped or prepared anything. But by supper time, I can no longer hide from my own willful ignorance.
I’m not always like this. I usually have a pretty good system for meal planning and grocery shopping, but for whatever reason, every year about this time, I find myself overwhelmed with my four boys’ baseball schedules, chorus and band concerts, school plays, field days, etc. that I push meal planning to the figurative back burner (the literal back burner would at least be cooking something, right?). After two weeks of texting Handsome Hubby to stop for takeout or easy dinners at the grocery store on his way home from work, or taking advantage of the Concession Stand’s pork sandwiches and hot dogs at the Ball Field, I knew I needed to do another round of Freezer Meals to get us through this busy time until I could be a trusted chef and meal planner again.
I love Freezer Meals because:
- I don’t have to THINK about dinner. I can just pull one out of the freezer and either bake it, grill it, dump it in the crockpot, etc.
- It keeps the kitchen nice and clean. A lot of the meals are all-inclusive, meaning they can be served as is. Others may need some sides to round out the meal, but it’s really not difficult to throw together a salad and slice some bread, or whip up some potatoes really quick.
- It saves so much time and money!
The last time I did a big Freezer Meal Prep Day, I made thirty-one meals. I had a glorious month of not having to worry about dinner on a nightly basis, and my family enjoyed home cooked meals for the entire month. Wanting to score those amazing perks again, I sort of last-minute decided to bite the bullet and prep over Easter weekend. By last minute, I mean Thursday night I decided, and Friday I was shopping and cooking.
Freezer Meal Tips!
If you’ve never done a Freezer Meal Prep Day, I feel I should warn you: it takes some planning. And by the end of it, you will feel accomplished, but exhausted. If you’re a newbie, some tips that you might not have thought of yourself are:
- Consider your trash pick-up day. You will have a ton of extra garbage after a day of meal prepping and if your family is anything like mine, our trash bin is usually overflowing anyways. Choosing to do my meal prep over a weekend was a good choice since our trash pick-up is on Mondays.
- Got fridge space? Make sure your refrigerator is cleaned out and organized before shopping. We have an extra refrigerator in our garage, so piling in the extra meat and veggies wasn’t a big deal. However, Handsome Hubby was a gem and ended up filling a cooler with ice and putting the ground beef in there for me, as some of the packaging leaked ALL over the outside fridge. It was easier to clean out the cooler afterwards than having to get in all those nooks and crannies in the refrigerator AGAIN.
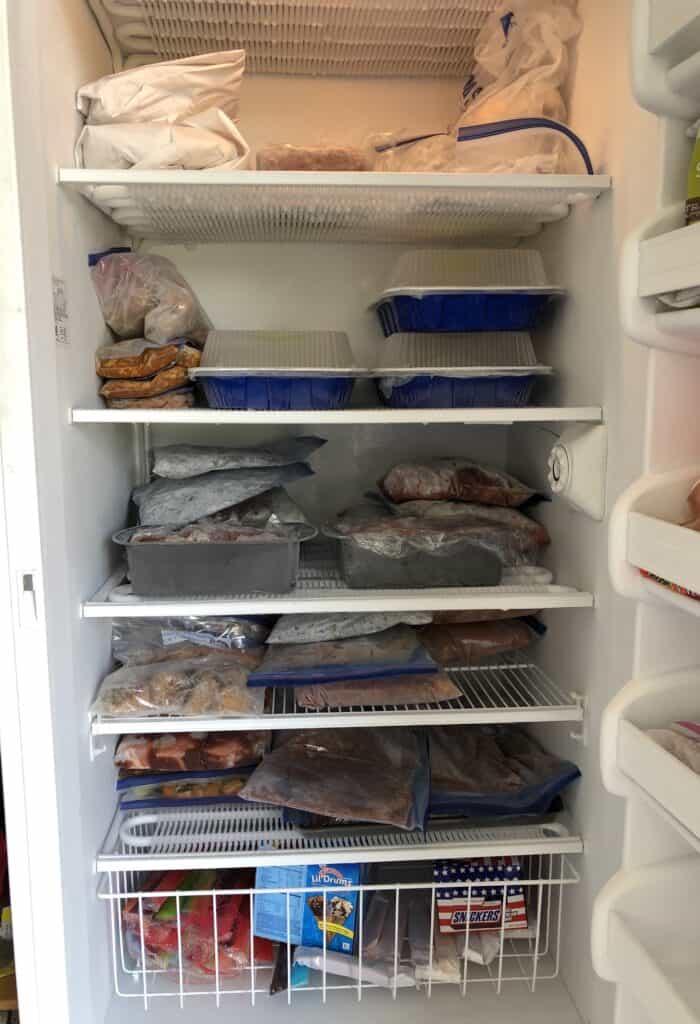
- How about freezer space? Where are you going to house all your frozen meals? Again, we have an upright deep freezer in the garage. If you don’t have one of these, I would seriously consider paring down your aspirations for a bulk Freezer Meal Prep Day, and maybe just prep weekly instead.
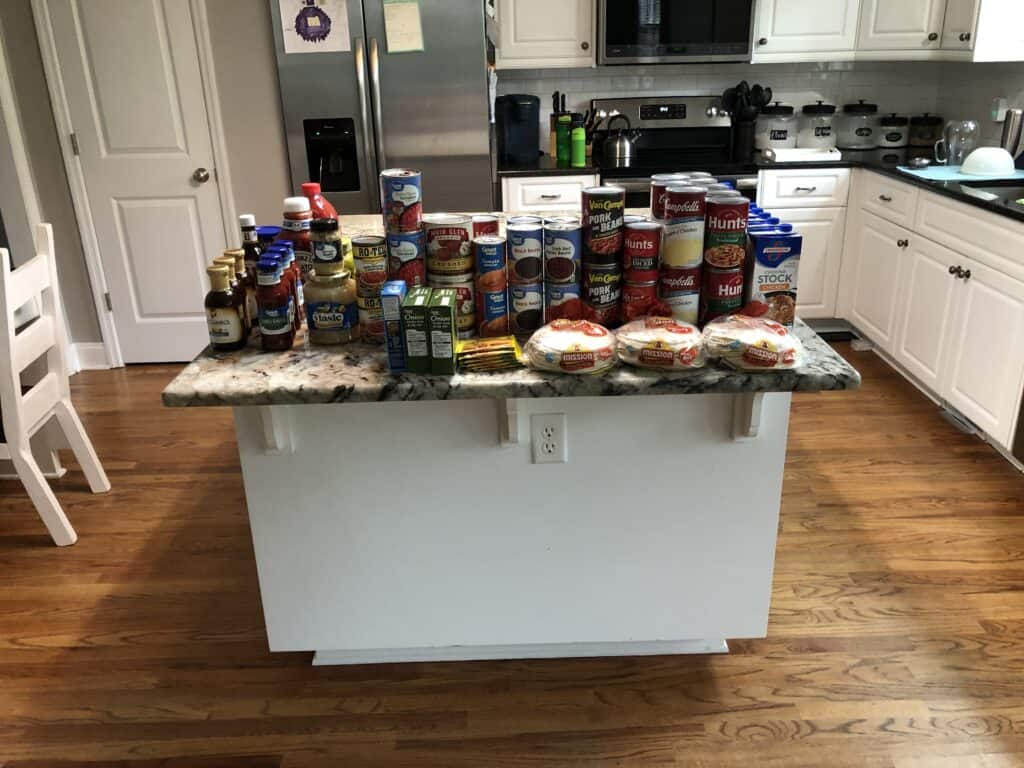
- Does your local grocer have a sale day for meats? Try to plan your shopping accordingly, or grab the bulk of your ingredients from a warehouse club store like Costco or Sam’s Club. Meal prepping like this will already save a ton of money in the long run, but if you can bring down the cost even more by shopping smart, why not?
- Since you’re already going to be worn out after this experience, I suggest making things easier on yourself by taking advantage of a grocery pick up or delivery service. I use Kroger’s Click List and Walmart’s Grocery Pick Up on the reg anyway and love them both. I picked up most of my items from Sam’s Club, and then used the pick up options from both of the other stores to get what I needed without having to step foot in any more stores.
- Aside from the food items, you’ll need ziploc freezer bags (gallon size), foil pans, cling wrap or press n’ seal, aluminum foil, parchment paper, and a sharpie for labeling your meals.
- When bagging your meals, make sure to label your ziploc bag with the meal’s name, the date you made it, and any cooking/heating directions you don’t want to forget.
- I like to keep a binder with recipes and an “inventory” of how much I’ve made of each thing. That way, when I’m deciding what dinner I’ll be pulling out of the freezer, I mark off whatever I take out and always know what’s actually out there, and when I’m running low on meals.
Check out these great disposable pans from Amazon:
Example Meal Plan
Okay, now that we’ve gotten those tips out of the way, you can start planning your meals. The trick is to double or triple the recipes. Instead of making 30+ different meals, you can make 10-15 meals in large batches. It saves time and money, and makes things so much easier. This time, I made 18 different meals and ended up with 45 freezer meals. I have a big family with four boys who eat their weight at every meal, so I adjust these recipes and portions accordingly. You can totally use your own favorite recipes, but if you need inspiration:
*Note: Lately, to make this easier, I just boil and shred some chicken breast, toss with dry ranch seasoning, and mix in buffalo sauce. Cool it, bag it (in your marked ziploc bag), and lay flat in the freezer.
*On Serving Day: Thaw in the fridge. Reheat in the microwave, crockpot or skillet until hot. Serve in a bell pepper (my family prefers them raw and crunchy, but you could bake them), and top with guacamole or sour cream. I usually serve this with a fruit salad for an easy weeknight meal.
(without the sauce because I forgot hot sauce from the store!)
*Note: As I said, I made these without the sauce. I used both ground chicken and ground turkey, and baked the meatballs according to the recipe’s directions. Once done, I allowed them to cool, and then flash-froze them. This is done by placing the cooked meatballs on a cookie sheet (I lined mine with parchment paper) and sticking them in the freezer so they get almost all the way frozen without touching each other. Then, when you bag them, they won’t stick together and become a big blob. Bag ‘em, freeze ‘em, the end.
*On Serving Day: Thaw in fridge and reheat however you like, or throw frozen meatballs (usually with the sauce) in crockpot on low 6 hours or until hot throughout. Serve with your favorite sides. We usually do a salad or pierogies with these.
Note: This is a family recipe (quite possibly stolen from Campbell’s). Cover with press n’ seal and lid (if your foil pans came with one).
On Serving Day: I like to top this off with scallions and bake at 350 degrees until hot throughout. Usually takes 30-45 minutes if thawed in the fridge overnight, longer if still frozen when you put it in the oven. I serve this meal with Mexican rice and refried beans. That’s it, that’s the whole enchilada.
*Note: I make this recipe as is. I don’t cook the casserole before freezing (just the rice before adding it to the mixture). Spread mixture in greased foil pan (9×13), cover with press n’ seal and lid.
*On Serving Day: Just like the chicken enchiladas, bake at 350 degrees until hot throughout. Usually takes 30-45 minutes if thawed in the fridge overnight, longer if still frozen when you put it in the oven. If I want the casserole to be enough for my brood, I have to serve it with a salad or bread or raw veggies and ranch, or all of the above, because THEY EAT AN UNNATURAL AMOUNT OF FOOD. Rant over….. for now.
(2) Chicken Teriyaki
*Note: Crockpot dump dinner! This one is not cooked ahead of time at all. Cut up some raw boneless, skinless chicken breast or tenderloins and throw it in a ziploc freezer bag with frozen stir fry veggies and chopped pineapple. Bathe it with some jarred teriyaki sauce and throw that sucker in the freezer.
*On Serving Day: Thaw in fridge overnight. Dump contents into crockpot on low 6-8 hours. Serve with rice or in tortillas, or with whatever you darn well please because you’re The Mom and You Said So.
*Note: I usually double this recipe and USE TWO POTS! Cool significantly before bagging (I double-bag this one).
*On Serving Day: Garnish options are already listed in the recipe. Thaw in fridge overnight, and then crockpot on low 4-6 hours or until hot. Ole!
(1) Seasoned Chicken Strips
(using extra chicken breast)
*Note: I had some extra chicken breast, so I sliced them into strips, seasoned them with salt, pepper, garlic powder, and a little paprika, and baked them at 425 degrees for about 15 minutes. Then I let them cool, and flash freezed them until hardened, and threw them in a bag and back into the freezer.
*On Serving Day: I will most likely pull out what I need and heat them in the skillet to top off salads, but you do you.
(2) Sloppy Joes
*Note: I usually double this recipe and double bag each batch.
*On Serving Day: Thaw and reheat in the microwave, skillet, or crockpot low 4 hours or until hot. Serve on hamburger buns with Ruffles potato chips (our fave!) or with tater tots, or atop a baked potato for a fun twist for your gluten-free family members.
*No notes on this one except we love it! And Eckridge smoked sausage is better than Hillshire Farms. The end.
*On Serving Day: Thaw in fridge overnight. Dump contents in crockpot on low 4-6 hours or high 3 hours. Serve over rice.
(3) Steak Fajitas
*Note: Crockpot dump dinner! Cut some steak (or buy the fajita-cut or stew-meat cut from the store). Season with a little salt, pepper, crushed red pepper. Throw it in the ziploc bag with sliced bell peppers and sliced onions, and bathe it in some A1 sauce or your favorite marinade. Throw it in the freezer for a rainy day.
*On Serving Day: Thaw in fridge overnight. Cook in a skillet, or bake it in the oven, or throw it in the crockpot low 4-6 hours, whatever mood you’re in! Serve in tortillas with sour cream, cheese, lettuce, and guac or eat it atop a bed of lettuce for a yummy salad.
(3) BBQ Pork Chops
*Note: Have trouble remembering to marinade your meat? Same here. This is simple. Throw some pork chops in the ziploc bag, and empty a bottle of your favorite bbq sauce in there. Props to you if you think about applying your favorite rub on the chops before they get all saucy. Throw ‘em in the freezer and forget about ‘em until G-Day (Grill Day… try to keep up. 😉 )
*On Serving Day: Grill ‘em or bake ‘em. Add your favorite sides and your favorite people, and you’ve got an old fashioned barbecue.
(2) Italian Meatballs in Sauce
*Note: Okay, I’m kind of lazy with measuring. For these Italian meatballs, I used a mixture of 80/20 ground beef and Italian-style ground sausage. Mix with 1-2 eggs and 1 cup of Italian bread crumbs per pound of meat, and add in some generous amounts of salt, pepper, onion powder, oregano, and quite a lot of minced garlic. Form into small balls (roughly the size of a golf ball) and place on parchment paper-lined cookie sheet. Bake at 350 degrees for roughly 30 minutes. Cool and flash freeze. Then throw them in a bag with your favorite pasta sauce (I used Hunt’s).
*On Serving Day: Thaw and reheat in the crockpot on low 4-6 hours or until hot. Serve on buns with mozzarella for meatball subs, or atop your favorite pasta, rice, or riced veggies.
(3) Taco Meat
*Note: Too easy. Brown some hamburger meat or ground turkey (sometimes I sneak in onions and shredded carrots). Drain and use your favorite taco seasoning (either homemade or pre-packaged.). Cool, bag, and freeze.
*On Serving Day: Reheat however you like until hot. Serve in shells or tortillas, with chips for nachos, in salads, or atop a potato for a Mexican potato bar!
(2) Meatloaf
*Note: I don’t really have a recipe for this one, except watching my Grandma make this for me every time I asked for it. Most people make 1-2 pound meat loaves, I usually have to make a 3-5 pounder. I use an 80/20 ground beef blend, add an egg or two per pound, breadcrumbs, onion, ketchup, salt, pepper, and a bit of garlic powder. Mix and spread into loaf pan (or casserole dish for some of us!) and weave some more ketchup on top. When freezing, I usually line a few loaf pans or casserole dishes with plastic wrap, spread the meat mixture into the dish, and wrap it up with the plastic wrap. Freeze, and then you can pop the meatloaf out of the pan (and stick in a ziploc bag for extra freezer protection). This way you’re not dooming your pans and casserole dishes to a life in the freezer for the next few months. You could also use the tin foil loaf pans. I had some extra meat mixture leftover, so I made a couple mini-meatloaves for Handsome Hubby when the boys and I are visiting friends and family for three weeks in June.
*On Serving Day: Unwrap the meatloaf and place back into a loaf pan or casserole dish. Thaw in fridge overnight. Bake at 350 or 375 degrees for roughly 45 minutes or until brown throughout. Meatloaf isn’t really meatloaf unless you serve it with mashed potatoes, corn, peas, green beans, and macaroni and cheese, right?
(3) Spaghetti Meat in Sauce
*Note: Another simple one! Brown some hamburger meat (toss in some onions, shredded carrots, green peppers, garlic, mushrooms if you’re into that). Drain, and mix with your favorite pasta sauce (I used Hunt’s.). Cool, Bag, and Freeze.
*On Serving Day: Thaw in fridge overnight and reheat in the microwave, skillet, or crockpot. Serve over your favorite pasta or pasta impersonator. Ha! An impasta!
*Note: Grandma’s recipe! I doubled this recipe. After cooking the meatballs, I allowed to cool and threw each batch (sauce and all) in the ziploc freezer bag (double bag).
*On Serving Day: I know these are cocktail meatballs, and yes I do make them for almost any party. But we also like to have them for supper sometimes with some pierogies or potatoes au gratin and a cooked veggie. Thaw in the fridge overnight and either bake or crockpot those glorious little balls of goodness until hot throughout.
(3) Chili Meat
Note: I was nearing the end of my Freezer Meal Prep Day at this point, and was running out of steam. I had planned to make a couple batches of chili and freeze it, and then I thought, “You know what? Chili is already a super easy meal to make. So I’m going to put the canned goods back into the pantry and just make the meat mixture so whenever I feel the urge to make some chili, I can just dump everything in the crockpot.” So that’s what I did. I browned the hamburger meat with onions and green peppers, drained, cooled, bagged, and froze it. You know the drill by now.
*On Serving Day: Thaw and add to your favorite chili ingredients. I will throw mine together in the crock pot. You probably already have a favorite chili recipe, but in case you don’t, you can use mine https://docs.google.com/document/d/17L4nGA8My9g8UdzQZT8AKRiHTSFAja6xO2zx_-sYqys
However, I have to warn you that it’s a humorously cursed recipe. It’s won a few chili cook-offs in its day, but with every win, there has also been a broken crockpot. Drop me a line in the comments if you want to hear more about this weird phenomenon.
(3) Philly Steak
*Note: There may have been a better way to do this, but again, it was near the end of my prep day and I was running on fumes. I popped a roast into the oven (with some pepperoncinis and quartered onions) after seasoning it and searing all sides on the stovetop. I baked it until we smelled that the onions and peppers had burnt, ha! Handsome Hubby shredded the meat for me and we tossed it into a bag with some more pepperoncinis and called it a day!
*On Serving Day: Thaw overnight in the fridge. Reheat in the crockpot and use for Philly Steak and Cheese sandwiches or for omelettes, salads, or whatever suits your fancy.
(4) Quick Lunch Options
(using extras from Chicken Enchiladas, I made Chicken Burritos and divided up extra Poultry Meatballs for lunches)
As I mentioned, I decided to do this round of Freezer Meal Prepping pretty last-minute, so Friday I still had to do some shopping before I could actually begin. I ended up getting a late start Friday afternoon on the actual cooking process, so I chose to focus on Chicken dishes that day, and wrapped up the Beef and Pork options the next day. It worked out because Handsome Hubby was home Saturday and was able to tend to the kids when they needed something (Independent seven through twelve year-olds are pretty awesome).
When is your Freezer Meal Prep day?
And that’s all she wrote! Now I don’t have to worry too much about supper for the next 45 days, and although it is a very tiring process, it’s worth the time and energy in the long run.
Comment below if you have any questions about the recipes or directions, or if you have a favorite recipe or method for Freezer Meal Prep!
I’m so excited to try this! I have done freezer meals in the past, but so many of them are chicken. I was pleased to find a good balance in your selections. I’m going to start my shopping list today. Thank you!!
Woohoo, Gina! Freezer Meals are such a game changer, aren’t they? Reach out if you have any questions!